Installing Windows 10, WSL2 and Ubuntu
This post outlines a process to efficiently install and maintain software on Windows 10 and Ubuntu, running in WSL 2. The steps describe a consistently repeatable method to install all of the software to enable a developer to be up and running, with various tools, in short order. You’ll be able to customise the steps to your particular needs.
I strongly recommend starting with a clean Windows install. If you dread the thought of a clean install, fear no more. Once you experience the ease and speed of re-installation you might just do it for fun! It’s important to note the process is not fully scripted and requires a few manual steps. Nevertheless the automation saves a ton of time!
Table of Contents
Prerequisites
- Windows 10 Professional (Version 2004 and above) 1
- A password enabled account with admin rights 2
- All updates and drivers applied
- Optionally enable Bitlocker
- Optionally create a system restore point
Windows Applications
Windows software is installed with Boxstarter Shell running powershell scripts that call Chocolatey. Initial installation is a true “one off” bootstrap step. Ongoing maintenance is achieved by updating.
Install Boxstarter
Open an administrator level, PowerShell window
Enter the following command 3
Set-ExecutionPolicy Bypass -Scope Process -Force; `
[System.Net.ServicePointManager]::SecurityProtocol = [System.Net.ServicePointManager]::SecurityProtocol -bor 3072; `
iex (New-Object System.Net.WebClient).DownloadString('https:/boxstarter.org/bootstrapper.ps1')); `
Get-Boxstarter -Force
On completion, there will be a Boxstarter Shell shortcut on the desktop.
Run an Installation Script
My windows-dev-box-setup-scripts github repository contains a number of bootstrap scripts. It’s unlikely that the software specified will suit your preferences. Feel free to use them, but note that they are subject to change at any time.
For the purposes of this post I’ll reference the 7590_bootstrap.ps1 script. This installs most of the Windows software I use on a regular basis. Take a moment to consider how long manually finding, downloading and installing all this software would take? 🤔
Open the Boxstarter shell from the desktop shortcut
Enter your Windows account credentials into the pop-up box invoked by running:
$creds = Get-CredentialRun the installation script:
Install-BoxstarterPackage -PackageName `
https://raw.githubusercontent.com/neilkidd/windows-dev-box-setup-scripts/master/7590_bootstrap.ps1 `
-Credential $creds
Go grab a ☕ or 🍵 as this might take a while 😄
- Alternatively, sit and marvel at the automation like some sort of geek 📺
On completion you will prompted to type
enterinto the shell. 4Reboot for good measure.
Chocolatey Scripting Tips
- There will be a number of reboots, it’s normal. Be patient.
- Git is installed early to ensure it is configured as specified and can be used as a dependency by other software.
- The “heavy” installers, that require reboots 5, go toward the top of the script. This speeds up the process. After each reboot the script will restart, checking and skipping work already done.
- Note the
choco pin add ...commands at the end of the script. The pinned applications are all self updating and will be ignored by choco when running updates in the future.
Manual Steps
SSH keys
If you use ssh keys with git, now is the time to configure them in Windows. You should end up with your key(s) in an .ssh directory in your home folder.
Github have a great guide on setting up ssh keys so I won’t duplicate it here.
Windows Terminal
The new Windows Terminal should be installed via the Windows Store. Simply fire up Windows Store search for Windows Terminal and click the install button.
I tried to automate the installation using a Chocolatey package. Unfortunately it was “out of band” meaning the application was orphaned and wouldn’t auto update.
Windows Subsystem for Linux
Follow the Microsoft manual install guide. Be sure to follow the steps for WSL2.
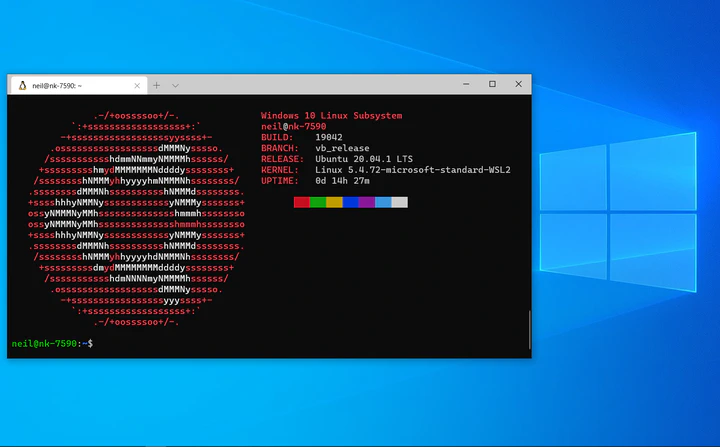
Ubuntu 20.04 LTS
I recommend LTS versions of Ubuntu as a daily driver. LTS server versions are currently supported for 5 years, with new releases every 2 years. In practice I look to perform a fresh install no sooner than the first LTS point release. E.g. 20.04.1, this means early bugs have usually been found and fixed. At the time of writing, the latest version is 20.04.1
- To install, head back to the Windows Store and search for
Ubuntu 20.04 LTS, and click install. - Click on the new Ubuntu shortcut in the Windows menu, where you’ll be prompted to set up a new user account. 6
Copy SSH Keys
We can now copy ssh key(s) from Windows into Ubuntu. 7 In Windows, your keys will usually be found in a directory at c:\Users\<your-username>\.ssh. They need to be copied to Ubuntu under /home/<your-username>/.ssh. In the following commands you’ll need to substitute <your-username> and id_rsa for your specific setup.
- Open Ubuntu in Windows Terminal
cd ~cp -r /mnt/c/Users/<username>/.ssh ~/.sshchmod 600 ~/.ssh/id_rsa
Docker Desktop
- Head over to docker.com, download the installer and click through in the old fashioned way. Make sure to tick the box for “Install required Windows components for WSL2”
- Open the Docker application and set the following options:
- General
- Start Docker Desktop when you login
- Use the WSL 2 based engine
- Resources, WSL Integration
- Enable integration with my default WSL distro
- General
- Reboot for good measure.
At this point you can validate the docker install by opening Windows terminal 8 and running docker --version in both Powershell and Ubuntu.
Ubuntu Applications
We now get back to automation by installing and configuring Ubuntu with Ansible. Ansible is used locally from a python pipenv.
My provision-ubuntu2004-on-wsl2 github repository contains all you may need. As before, it’s unlikely that the software and configuration specified will suit your preferences. Feel free to use it, but note that it is subject to change at any time.
Open Ubuntu in Windows Terminal and let’s get going.
Install Python 3 & pipenv
cd ~sudo apt install --yes python3-pipsudo pip3 install pipenv
Clone and Run
git clone git@github.com:neilkidd/provision-ubuntu2004-on-wsl2.gitcd provision-ubuntu2004-on-wsl2pipenv install --devpipenv shellansible-galaxy install -r requirements.ymlansible-playbook playbook.yml -i inventory --ask-become-pass- Enter your Ubuntu password
Updating
The scripts are designed to make updating the installed software a breeze.
Windows
In Windows you have 2 options:
- Open an elevated Powershell window and run
choco update all - Use Chocolatey Gui
Ubuntu
- cd into the ansible working directory
pipenv shellansible-playbook playbook.yml -i inventory --ask-become-pass- Enter your Ubuntu password
Installing New Software
The best advice is, be disciplined! Always keep your repositories and scripts up to date and ready to go.
New Windows Software
- Find the package on the Chocolatey website
- Copy the required upgrade command
- Run the command in administrative Powershell window
- pin the application if it self updates
- Add the command to the install script
- pin the application if needed
- Commit and push the script
New Ubuntu Software
- Edit the ansible repository
- Run ansible as per the updating instructions
- Commit and push your changes
Summary
All being well, you now have a repeatable and easily maintained Windows and Linux working environment. It’s liberating to know that you can experiment, break things and get back to a working state quickly.
Have fun automating ⚙️
References
- What is Apt-get upgrade and dist-upgrade
- Sharing ssh keys between windows and wsl2
- Jeff Geerling’s Ansible Content
Not tested on Windows Home Edition. ↩︎
Username and password is required for reboots. Configure alternate options post install. ↩︎
I believe this is a bug, but no show stopper. ↩︎
I’m looking at you Visual Studio! ↩︎
Note the Ubuntu account is completely separate from your Windows user account. The Microsoft docs are here. ↩︎
There are alternative methods for sharing ssh keys. ↩︎
Quickly open Windows Terminal by hitting the Windows Key, type
wt+ enter. ↩︎
Neil Kidd
Head of Academy
My interests include Software systems development, flow and what enables organisations and people succeed.