Deploy from Gitlab to Hostinger with SSH & rsync
 Logos from official websites
I’ve recently switched hosting platform to Hostinger 1 and needed to work out how to auto deploy the site via Gitlab CI/CD. This was done by using rsync and SSH.
It’s still early days but in terms of ease of use, features and VFM the Hostinger platform appears to be a significant upgrade on the previous host.
Table of Contents
Toward Simplicity
In 2019 I switched this site to HUGO and Gitlab Pages, fronted with a Cloudflare CDN. This achieved a consistent speed increase and SSL transport.
Hostinger offer a 30 day money back guarantee and I wanted to test and compare the new hosting platform without Cloudflare2. This is attractive because the domain DNS, hosting, emails and SSL can all be managed in one place and the gitlab pages site will no longer be needed.3 In any event the CDN can be added later.
Deployment to Hostinger servers can be done with plain old FTP or SSH. Given the security of FTP, SSH it is!
Prerequisites
The example uses a gitlab repository that pushes to a gitlab pages site. Nevertheless the core technique of using rsync over ssh could be adapted to push any artifact to Hostinger.
- A gitlab pages site deployed via .gitlab-ci.yml.
- A Hostinger account with a domain configured.
Hostinger Configuration
I recommend that you configure a domain, activate the free SSL1 and get to a situation that the default page is displayed on your website.
Enable SSH
Create SSH Keys
Generate a password free 4 SSH key pair specifically for deployment. Store the key pair files somewhere safe.
ssh-keygen -t rsa -b 4096 -f hostinger_id_rsa
Hpanel Settings
Login to the Hostinger control panel 5.
- Click the Manage button for your domain
- In the left menu, navigate to advanced and ssh-access
- In the top right of the page, click on Enable and you should see SSH status set as Active.
- Take a note of the IP, Port and Username.

SSH Enabled - Scroll down and paste your generated SSH public key into the interface. For simplicity and future reference, use the same name as the key file.
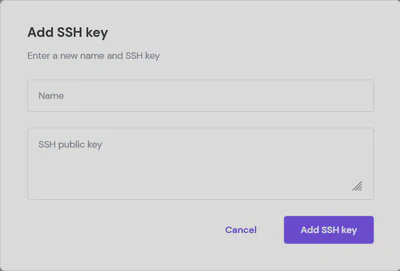
Add public key
Test the Keys
Using your client of choice, login via the command line.
ssh -p <PORT> <USERNAME>@<IP> -i <PATH_TO_PRIVATE_KEY>
In the SSH session, locate the target public_html directory for your domain and make a note of the path. In my case it is:
/home/<USERNAME>/domains/kidd.org.uk/public_html
Server Host Key
To avoid being prompted to accept the servers host key, you will need to find the servers key with ssh-keyscan.
Copy and save the output from the following command:
ssh-keyscan -p <PORT> <IP>
Gitlab Configuration
The following example uses alpine based HUGO containers. You may need to adjust the commands for your runner or containers base distribution.
Variables
To add variables in Gitlab, navigate to Settings, CI/CD, scroll down to Variables and click Expand.
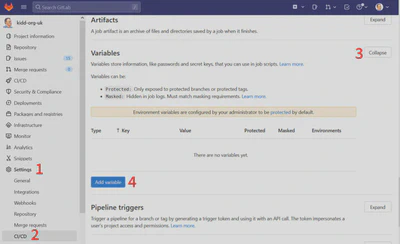
Add each of the following variables. I masked all of the variables that the UI would permit.
| Key | Description |
|---|---|
SSH_USER | Username in Hpanel |
SSH_HOST_IP | IP in Hpanel |
SSH_PORT | Port in Hpanel |
SSH_TARGET_DIR | Target public_html directory - without a trailing slash. |
SSH_PRIVATE_KEY | Private key - created above. |
SSH_HOST_KEY | Content from ssh-keyscan |
.gitlab-ci.yml
The following example could be more modular, however it’s shown in a single step for simplicity.
Note that the image hugo_extended:0.101.0 is based on Alpine linux so apk is used. The biggest challenge was working out the quotes for the rsynch -e switch. 🤯
# All available Hugo versions are listed here:
# https://gitlab.com/pages/hugo/container_registry
image: registry.gitlab.com/pages/hugo/hugo_extended:0.101.0

build_deploy:
  only:
    - master
  variables:
    # Set to "true" for lots of info in the logs
    CI_DEBUG_TRACE: "false"
  before_script:
    - cat /etc/os-release
    - apk update
    - apk add openssh-client rsync
    - eval $(ssh-agent -s)
    - echo "$SSH_PRIVATE_KEY" | ssh-add -
    - mkdir -p ~/.ssh
    - chmod 700 ~/.ssh
    - echo "$SSH_HOST_KEY" > ~/.ssh/known_hosts
    - chmod 644 ~/.ssh/known_hosts
  script:
    - hugo --gc --minify
    - |
      rsync --verbose --recursive --times --delete --progress --human-readable \
      -e 'ssh -p "'"$SSH_PORT"'"' \
      public/ \
      $SSH_USER@$SSH_HOST_IP:$SSH_TARGET_DIR
On a free Gitlab account, the whole script has never exceeded 30 seconds. Uptime Robot is now reporting an average response time of 360ms and I’m happy with that.
Now, I do wonder about adding the CDN 😆
This IS a referral link. If you decide to use it, thanks. I appreciate it. ↩︎ ↩︎
It always troubled me that the Gitlab pages site was “live” but technically broken when accessed directly. HUGO generates absolute links to the actual domain meaning the styles and images didn’t load. 😢 ↩︎
Technically, the gitlab pages site could remain, however “less is more” 😉 ↩︎
Press enter when prompted for a password ↩︎
My package uses the hpanel - yours may differ. ↩︎
Neil Kidd
Head of Academy
My interests include Software systems development, flow and what enables organisations and people succeed.